FAQ
This page is intended for those who want to build their own arcade machine or classic game controllers. If you're planning to restore an existing arcade cabinet, please take a look at the topic restoration.
There are a dizzying variety of skills, disciplines, methods, materials, and resources involved in this hobby. This FAQ is intended to provide a a general overview of basic topics and common terms for newcomers to the arcade and emulation community. It is designed to be a starting point for choosing useful search terms and asking better/more effective questions in the BYOAC Forums.
Contents
Cabinet Basics
Main article Basics.
Arcade cabinets (often shortened to 'cabs') are gaming machines that include the screen to display the game, controls to play the game and the computer hardware that runs the game.
Types of cabs
Main article Arcade Cabinet.
Arcade cabinets come in various shapes and sizes. Commercially build and operated cabinets are often build to play a single game and are therefore created to match the target audience or recreate the atmosphere of the game.
Standing
A standing cabinet is the most common cabinet in North America and Europe. Players stand in front of the machine while playing the game.
- Regular, the iconic, archetype, arcade cabinet. The monitor is usually above waist height with the marquee overhanging.
- Cabaret, a slightly smaller version of the regular cabinet. The marquee is often located between the control panel and coin door.
- Low-boy, a standup cabinet where the marquee is in the same plane as the monitor making the cabinet much lower, hence the name.
- Pedestal, a arcade where the screen is not part of the arcade setup. The monitor could be a TV or projection attached to a wall.
- Showcase, a setup where the screen is in a separate housing as the control panel but still visually part of one setup. Setups like this usually feature a large screen positioned in such way that onlookers may view the action. The 'showcase' may both refer to the player being able to showcase his or her gaming skill as to the elaborate arcade setup itself.

Seated
Seated cabinets come in two distinct categories; arcade cabinets intended to sit at for easier long play sessions or themed cabinets that involve an activity where sitting down mimics the action of the game (such as driving a car).
- Candy, the most common cabinet in Japan. The cabinets are often made of hard plastic - the shiny plastic appearance led to them being called 'candy cabinets'. These cabinets are quite similar to standup cabinets except that they are lower and often have a larger control panel surface. See also List of Japanese cabinets on Wikipedia].
- Cocktail, the most common sit-down type in North America. An arcade that resembles a table with the screen embedded in the table surface. The surface is made of hardened glass so people can place their drinks on it.
- Cockpit, an arcade that mimics the cockpit of a racecar, fighter plane or spacecraft. The controls are often matched to the type of vehicle portrayed, such as a steering wheel, pedals, gear shifter or flight yoke.
- Ride-on, similar to the cockpit arcade, a ride-on often is build specific to the activity of the game(s) played. Ride-on cabinets may feature a motorbike or jet ski seat but also less obvious vehicles such as a minecart.

Small
Another category of cabinets are the small size cabinets.
- Mini, a small version of a cabinet resized to suit play for children.
- Bartop, a portable cabinet that can be placed on top of a table (or as the name suggests, on the bartop in a pub or diner).
- Barstick, a bartop without a built-in display. It is usually connected to a TV.
- Micro, micro cabinets are extremely scaled down cabinets. Building a functioning micro cabinet provides experiences cabinet builders a new challenge. Micro cabinets provide a eye catching model for display.
Other
Some arcade cabinets are built for a single gametype or purpose.
- Digital Pinball Table, a digital pinball machine is designed to look and act like an actual pinball machine with the ball(s), lighting, playfield and backglass replaced by monitors and pinball simulation software. See also: Pinball.
Parts of a cabinet
Main article Arcade_Cabinet#Anatomy_of_a_cabinet.
Arcade cabinets vary in size and complexity but they generally comprise the same basic features as shown on this diagram.

- Marquee. Back-lit artwork that displays the cabinet's name.
- Marquee retainers. A part to keep the marquee in place. Allows easy replacement of the marquee graphic.
- Speaker panel. The panel which holds the speakers.
- Monitor bezel. A part that surrounds and masks the monitor in the cabinet. In some arcades the bezel also features artwork.
- Control panel. Holds the joysticks, buttons and other controls needed to play the games.
- T-molding. T-molding is used to finish and protect the edges of the woodwork.
- Coin door. A coindoor to accept coins for play.
Building your own Arcade
Main article Building.
What type of build meets my needs?
One common pitfall of arcade building is trying to build a cab to "play everything" and ending up with a monster of a control panel often nicknamed a frankenpanel by the community. Consider what you want to achieve and what your limitations are before starting to build.
- Start by considering where you want to put/use the cab. Measure the doorways so you can actually move the arcade from the place of construction to the gameroom. Consider what type of cab (upright, sitdown, cocktail, bartop, etc.) will fit your circumstances. Consider possible reflections of windows/lamps on the monitor and power outlet availability.
- Make a list of the games, emulators, and front end you want to use. This list should include any "can't live without" games and will help you choose a suitable computer. Check the multi-player, dual joystick, rotary joystick, analog joystick/yoke, lightgun, and spinner gamelists to see if there are enough "can't live without" games in each list to justify including these specialized controls in your build. Also check out BadMouth's "All Killer, No Filler" game lists here.
- Consider the number of simultaneous players you want to support. Keep in mind that more players means adapting your control panel; the more controls the more room you'll need (space might be an issue). If you plan to support more than 2 players, make sure all players have a good view of the screen. Also more players probably means a bigger budget- keep in mind that there are alternatives like using USB joypads for letting other players join in or using a 2-player version of a 4-player game like Gauntlet, TMNT, or X-Men.
- Figure out what kind/quantity of controls you'll need to support the games and emulators on your list. Go through the list to determine what controls you will need. Joysticks come in many variants such as 4-way, 8-way, and analog. Some games or consoles require analog controls. Keep in mind that some controls can be used as alternative: for example a trackball might also work as a spinner or mouse. A spinner might also work as a steering wheel. Note that reusing controls is also subject to personal preference and is an often discussed subject within the community.
- What computer do you want/need to use. Newer games means a newer computer. If you already have a computer you plan to use, try some emulators on it to see what games it is capable of running - cross check this with the games you want to play.
- That will lead you to what emulators and other software like front-ends you want/need. Emulators are programs that can make the computer act as a (retro)gaming system such as an arcade machine or game consoles. Do you want the players to be able to switch games? There are many programs where players can select and start games (this kind of software programs are known as front-ends. Configuring the computer to run old games is also part of the hobby!
- Choose your encoder. The encoder is a specialized piece of electronics that connects the controls to the computer. There are several vendors that sell encoders, it is also possible to create your own by hacking a keyboard or gamepad. It is usually much easier to buy an encoder from a vendor instead. A few things to keep in mind when selecting an encoder such as the number of supported inputs (how many buttons can you connect) support for analogue devices (trackball, spinner etc.).
- What is the artwork/theme/design you want to use? Picking the artwork or theme early may help you selecting the colors of the buttons or t-molding. It may also affect the way you want to arrange the buttons on the controlpanel or the size of the marquee.
- Arrange the controls on the control panel. It is highly encouraged to create a mockup panel out of cardboard, hardboard, or even MDF to test the layout. This enables you to "feel" if the controls are in the right place and the control panel is comfortable to play. Slagcoin has many printable button layouts.
- Select a monitor. What kind of monitor do you plan to use? Consider that the size may affect the dimensions of the cabinet. Keep in mind that many arcade games have the monitor in portrait mode (while these are still playable on a landscape oriented monitor, the games will often be scaled down). Some emulators can use special effects (shaders) to simulate the appearance of an old CRT monitor on LCD (flat panel) monitors, this usually requires a decent videocard.
- Design the rest of the cab around the monitor and control panel. The control panel and monitor often dictate the required dimensions for the rest of the cabinet. Keep also in mind the considerations at point 1 in this list!
There are many more topics to explore such as rotating monitors, swappable control panels, and modular control panels. This list is by no means complete but it should provide a solid foundation for you to start designing your own cab!
What is the difference between an original arcade cab and a MAME cab?
An original arcade cabinet refers to a cabinet designed for commercial operation. These cabinets are often crafted for a specific game or specific type of dedicated arcade (computer) hardware. A MAME cabinet is the collective name for a cabinet intended to simulate the arcade experience. These cabinets are usually configured to allow users to play many different games.
Some original arcade cabinets have electronic components like Printed Circuit Boards (PCBs) or monitors that are missing or damaged beyond restoration. Sometimes replacement parts are impossible to find or outrageously expensive. Sometimes the artwork or body of the cabinet is badly damaged. Problems like these can make restoring a commonly-available cabinet so difficult or expensive that it clearly isn't worth preserving. Cabs like those are possible candidates to convert to a MAME cabinet. Remember to preserve as much as possible and, as the saying goes, "Please don't maim for MAME."
Also note that the name MAME cabinet refers to the emulator MAME, but in many cases several other emulators are used to play games. MAME is the most common emulator to play arcade games.
What is JAMMA/JAMMA+?
Main article JAMMA.

JAMMA is a wiring standard developed in 1985 by Japan Amusement Machine and Marketing Association, Inc. It allows you to easily change between JAMMA compatible game boards without re-wiring the cabinet.
If you plan to build your own arcade from scratch with your own PC, the JAMMA standard does not apply; it is an industry standard.
The JAMMA standard uses a 56-pin edge connector on the board with inputs and outputs common to most video games. JAMMA Games that have more than 3 action buttons, more than 2 players, or different control types use the JAMMA+ standard.
The JAMMA standard enables you to hook an original arcade cabinet to a PC using a J-PAC encoder. This allows you to use the existing controls to play emulated games. See also: Connecting a PC to an Arcade Cabinet.
If you have JAMMA compatible game circuit boards, you will need JAMMA compatible arcade hardware to be able to play them.
The Real Bob Roberts™ JAMMA links:
Controls
Main article Controls.
Authentic controls and control panels give you that original arcade feel.
Joystick Types
Main article Joysticks.
A Joystick is a device to let you manually control direction of movement in an arcade game. When selecting the correct joystick for your setup, keep in mind the games you wish to play. Note that there are also games that use dual joysticks.
2-way
2-way joysticks register movement along either the X-axis or Y-axis. These joysticks are operated by triggering microswitches or leaf switches which means these are absolute -- either movement in a direction is triggered or not. 4-way or 8-way joysticks can be used as physically-restricted 2-way joysticks by using a slot-shaped restrictor plate.
4/8-way
4-way and 8-way joysticks register movement along the X-axis and Y-axis. These joysticks are operated by triggering microswitches or leaf switches which means these are absolute -- either movement in a direction is triggered or not. Both 4-way and 8-way joysticks have 4 microswitches or leaf switches. The difference between 4-way and 8-way joysticks is that a 4-way stick can only activate one switch (up, down, left, or right) at a time, but an 8-way stick can register up to two switches (up+right, etc.) at a time. Some joysticks have a restrictor plate that limits/defines the joystick's range of motion, allowing you to select 4/8-way operation. There are also models that can automatically switch between physical 4-way and 8-way restriction using a motor/actuator controlled by software.
Analog
Analog joystics can discern how far the handle has been pushed from the center position. This type of joystick is often used where the player must be able to control the movement in a smooth way, for example pushing the joystick further also makes the game character move faster in the chosen direction.
Speciality joysticks
Speciality joysticks include 49-way joysticks, rotary joysticks, TRON joysticks and joysticks with a trigger and/or one or more buttons.
Buttons
Main article Pushbuttons.
See also: Working with Microswitches. See also: Wiring Push Buttons and Conventional Digital Joysticks.
Pushbuttons are the simplest and most common form of control consisting of a momentary switch that makes contact when pressed. Buttons come in various colors, shapes and sizes. Round buttons are usually used on control panels.
Pushuttons with 3 tabs have Common (Com), Normally Open (NO), and Normally Closed (NC) connections in a SPDT configuration.
Pushbuttons with 2 tabs are in a SPST configuration.
Layout
The placement of buttons (and joysticks) is often influenced by personal preference. It is wise to consider using one of the common layouts used in the arcade industry, as these were designed to allow players to reach and rest their fingers on buttons with minimal hand strain. The Slagcoin website has a list of descriptions and printable layouts that are highly recommended reference material.
Before constructing a control panel, a cardboard mockup often gives you a good impression if the controls are comfortable to use.
Number of player buttons
The number of player buttons (buttons used during gameplay) to put on your panel is determined by the the games you plan to play. Most fighting games used 6 buttons in a 2 rows of 3 buttons configuration. The Neo-Geo used 4 buttons in a single row. Some people combine these two layouts in a 2 row layout with 3 buttons on one row and four on the other.
Note that no arcade machine uses more than 4 buttons for players three and four.
If you are making a dedicated cab for 4-way joystick games, you will only need 2 player buttons unless you want to include:
4-way joystick 3 button games
- Iron Horse
- Punch Out!!
4-way joystick 4 button games
- Mouse Trap
- Super Punch-Out!!
Number of admin buttons
Commonly used admin buttons/function include P1/P2 Start (1/2), P1/P2 Coin (5/6), Pause (P) and Exit. (ESC)
To keep guests or children from accidently messing up their cab configuration, many individuals choose to not include a Menu (Tab) button and disable the shifted function for Menu. (P1 Start + joystick right on I-Pac)
There are several schools of thought concerning admin buttons -- some people prefer dedicated admin buttons, while others prefer using "shifted functions".
Dedicated admin buttons:
- PRO + Button functions can be clearly labeled on the panel art or using inserts in translucent buttons.
- CON - Too many buttons can be confusing and make a panel look cluttered.
Commonly used dedicated admin buttons include P1/P2 Start, P1/P2 Coin, ESC (exit), Pause, and others. Some console emulators may also require additional functions so be sure to install and configure desired emulators before building your panel.
"Shifted functions":
- PRO + Can make the panel look less cluttered.
- CON - When the "shift" button is pressed, any button pressed at the same time will output the associated shifted function. This may trigger an unintended function (exit, pause, menu, etc.) during a multi-player co-op game when one player performs a shifted function and the other player continues playing.
"Shifted functions" require a button/input to act as the "shift" button -- P1 Start on the IPac, HWB on the KADE, and Shazaaam! on the KeyWiz.
Pressing P1 Start and P2 Start will cause an IPac to output ESC. (exit)
Include an instruction card on the control panel overlay or screen bezel so family members and guests can figure out how to operate the cab.
Illuminated buttons
Main article Lighting.
Many vendors sell illuminted single-color buttons and/or RGB (Red/Green/Blue) LED lighting kits for pushbuttons.
Illuminated buttons can be wired directly to a power source for constant single-color illumination or you can change brightness (single-color or RGB) or color (RGB) using software and a USB LED controller board like the LED-Wiz or the PacLED64.
Trackballs
Main article Trackballs.
A Trackball is a large ball that can be pushed in any direction to control an arcade game. Trackballs provide precise analog control, much like a mouse.
Spinners
Main article Spinners.
A Spinner is a knob that can be spun rapidly in either direction to move an on-screen paddle or character. Spinners provide precise analog control like a mouse, but act only along one axis.
Other specialized controls
See also: Category:Controls.
Yokes, steering wheels, trigger stick, rotary joysticks, light guns, etc.
USB gamepads/controllers
One way to expand the number of games that you can play (without turning your control panel into a "Frankenpanel") is to use gamepads or controllers plugged into external USB ports.
USB gamepads allow you to add Players 3+4 to a 2-player cab or play console games that use "shoulder buttons" or two analogue joysticks per player (twin stick shooters).
You can also add controllers with specialized controls like an analog flightstick for Afterburner or rotary joysticks for Ikari Warriors. Another option is to add controllers with specialized layouts for Defender or Asteroids.
Construction
Main article Building.
Building your own arcade cabinet or controller can be a rewarding experience. The construction itself involves various disciplines from woodworking, electronics and design. While some people in the community have produced exceptional cabinets, everyone with some practice and dedication can build a cabinet. The wiki has an example project with images to give an impression of how a cabinet is built.
What tools do I need?
Main article Hand Tools.
Main article Power Tools.
Building your own arcade machine is no simple task and requires the correct tools as well as the knowledge of how to use each one correctly and safely. Keep the safety guidelines in mind for each tool in when using them!

Design
Main article Technical design software.
Planning is everything is this hobby. To make sure your design fits together as you had in mind it is wise to sketch out your designs first. Regular paper sketches with measurements might suit your needs. There is also software (some available for free) to help design your cabinet. Often community members share their designs in digital files. Sketchup is quite popular, but other software such as Microsoft Visio works as well.
What type of wood to use?
Main article Wood products.
In building an arcade cabinet, several types of materials are available to you. Each has its strengths and weaknesses. The most common used materials are MDF, Plywood and MDO.
What thickness and materials to use for the Control Panel?
Many people use MDF, Plywood or MDO since they are easy to work with.
Some use metal.
Some control panel artwork comes with a thin polycarbonate lamination that protects the artwork from wear and tear, but artwork without it needs to be protected using 1/8" plexiglass, polycarbonate, or acrylic.
Plexiglass is usually held down by the pushbuttons/nuts.
If you are using T-Molding, the combined thickness of all the layers needs to add up to the width of the T-Molding.
For example, 5/8" MDF + artwork + 1/8" plexiglass = 3/4" T-Molding.
If you aren't able to find T-molding that matches the thickness of the layers, you can use a chamfer or roundover router bit to angle the lower edge of the control panel.

Mounting controls in the control panel
Part of planning is reviewing the mounting options. Some controls require clearance on either side for mounting. When in doubt, tt is advised to use a cardboard mockup to verify the clearances of the controls.
Hardware
There are three types of hardware commonly used to mount joysticks.
This hardware is purchased separately from the joystick due to the variety of mounting options and methods.
Carriage Bolts: Carriage bolts have a rounded top and a square base slightly larger than the threads.
- PRO + Strongest mounting method.
- CON - Visible bolt heads can distract from artwork.
Tee Nuts/T-Nuts: The two common styles have either prongs or holes for small nails to keep the nuts from turning when screws are tightened/loosened. The kind with the nails is usually a better choice than the kind with prongs because it's much easier to drill tiny pilot holes for nails than it is to drive prongs into dense MDF.
- PRO + Almost as strong as carriage bolts.
- PRO + Can be hidden in a shallow countersink.
- CON - Requires more work to prepare a smooth surface for paint or vinyl artwork.
- PRO/CON Use a piece of tape to ensure that wood putty does not get into the threads of the nut, otherwise the hardened putty may be pushed up when you tighten the screw and damage the smooth surface.
- PRO/CON Screws used must be long enough to engage the tee nut, but not so long that they break through the top of the control panel.
Threaded Inserts: These are preferred over wood screws in materials such as MDF. Regardless of what kind of thread geometry the wood screw has, with MDF you can only tighten it reliably once. When you loosen and retighten a screw in MDF it pulps and strips it. Good threaded inserts for MDF have very wide/flat/thin outer threads that cut into the MDF and keep the insert from backing out when the machine screws are loosened. The negative example below has outer threads that are too narrow to work properly with MDF. Threads on the inside allow you to remove/replace the machine screws in the event you want to replace the joystick.
- PRO + Easiest way to leave a smooth surface for paint or vinyl artwork.
- PRO/CON Screws used must be long enough to engage the insert, but not so long that they break through the top of the control panel.
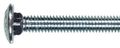
Carriage bolt
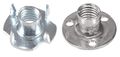
Tee-nuts
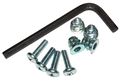
Threaded insert kit.
Photo © IDVT Inc. / GroovyGameGear.com, Used with permission.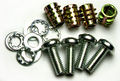
Threaded insert kit.
Photo © Ultimarc.com, Used with permission.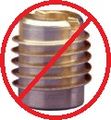
Wrong inserts for MDF: the threads are too small on this type


Push buttons
Most push buttons mount in a round hole -- usually 1-1/8" (28mm) or 30mm. Most push buttons are (from a construction point of view) similar to a nut and bolt: the threaded end is below the control panel and held in place by a nut. Some push buttons have flexible tabs that lock in place under the panel. This type of button is usually used with metal control panels.
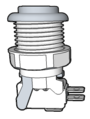
Threaded button
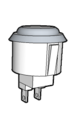
Locking-tab button


Joysticks
There are several ways to mount a joystick in a control panel.
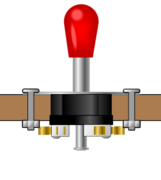
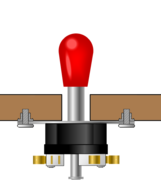
Top mount
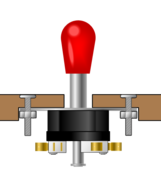
Under mount (threaded inserts)

Under mount (tee-nuts)
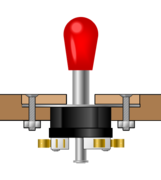
Under mount (recessed, countersunk screws)
Under mount (support blocks)
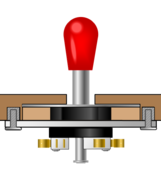
Top mount (recessed)


- Top mount The joystick is mounted on top of the control panel; for this a larger hole must be cut in the panel to accomodate the base of the joystick. A top mounted joystick adds a raised plate on top of the panel which is generally undesired if any artwork is to be added to the control panel. Also screws cannot be countersunk using this method. Carriage bolts are commonly used for this mounting configuration.
- Under mount The joystick is mounted underneath the control panel. Countersunk fasteners or threaded inserts leave a flat surface for comfortable play and application of artwork. The downside to this method is either the loss of joystick height or an increase in the distance the stick must travel to actuate the switches. countersunk screws/bolts, tee-nuts or threaded inserts are commonly used for this mounting configuration.
- Under mount (recessed) The joystick is mounted underneath the control panel. An area is cleared using a router to sink the joystick into the wood; this gives the joystick more height for play. Tee-nuts/T-nuts, countersunk screws/bolts, or threaded inserts are commonly used for this mounting configuration.
- Under mount (support blocks) The joystick is securely supported inside a recessed gap using blocks held in place by a metal plate or flat metal bars secured to the control panel by threaded inserts or tee-nuts. This forum topic has an excellent example of this method. The photos below are from the forum topic, used with permission from EMDB.
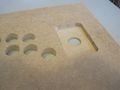
1: Routed area
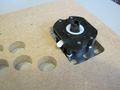
2: Fitting joystick
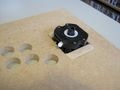
3: Added support blocks
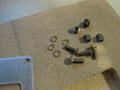
4: Threaded inserts
5: Plate to secure the joystick


- Top mount (recessed). If (1) the joystick shaft is very short, (2) you don't want the joystick mounting plate exposed, and (3) need the strongest shallow-mount option available, use a top mount (recessed) configuration. The cover piece can be secured using countersunk screws as shown or a cover piece the size of the whole control panel can be held in place by the push buttons. See this topic with an example and explanation of this method. The down-side of using this method is that it is much more difficult to remove and replace joysticks than with the other methods.
Orientation
It is important to note that joysticks should always be mounted parallel to the screen since it is intuitive for a player to move the joystick in relation to the action on the screen. This might seem not obvious in 4-player designs, but experience has proved that this holds true even if the player is standing diagonal towards the screen. Therefore it is advised not to angle joysticks for players 3 and 4. P3, P1, and P2 joysticks are shown parallel, while P4 joystick is shown angled.

The notable exceptions to this rule are the diagonal games Q*bert, Q*bert's Qubes, Inferno (1 angled stick and 1 angled trigger stick per player), and Congo Bongo. The 4-way joystick is angled 45 degrees clockwise -- up relative to stick = up+right relative to the monitor. Since your on-screen character can only move in diagonals, this keeps the joystick up/down/left/right directions aligned with the on-screen action.
Trackballs
See also: Trackball Mounting.
Mounting a trackball in a wood panel is often done with the aid of a mounting plate or kit.
If you aren't using a mounting plate, there are several tools that are good for cutting the large circular hole.
- Holesaw
- Dremel tool circle cutter attachment
- Router circle cutter attachment
- Adjustable circle cutter
There is further information and several useful links in this post.
Encoders
Main article Encoders.
An encoder is a device that interfaces between the controls and the computer running the games. In the early days of the hobby, keyboard or gamepad encoders were often re-used/hacked by soldering wires to the connection points. Today vendors have different kinds of encoder circuit boards to make the process much easier and more reliable. Encoders usually connect to the PC using USB or PS/2 connectors.
What type of encoder(s) do I need?
There are four basic types of encoders presently available:
- Keyboard Encoders When using this, the computer will interpret the connected controls as if it was a keyboard.
- PRO + Most games are able to use the keyboard inputs.
- PRO + Most encoders come preconfigured with an arcade configuration.
- PRO + Keyboard encoders can support multiple players (see also how many encoder inputs do I need).
- CON - Can only handle digital (either 'key down' or 'key up') inputs.
- CON - Certain key combinations described here can cause accidental loss of focus or other undesired functions.
- PRO/CON Most 4-player encoders have overlapping keys described here that you may want to reprogram.
- Gamepad Encoders When using this, the computer will interpret the connected controls as if it was a gamepad.
- PRO + Usually plug-and-play.
- PRO + Gamepad Encoders that support analog (potentiometer) controls are called Analog Encoders.
- CON - Usually one player per encoder (as one gamepad per player).
- CON - Not all software supports gamepads.
- Rotary Encoders A rotary encoder is required to interface rotary mechanical joysticks like the ones used for Ikari Warriors.
- PRO + Most models have additional gamepad or keyboard inputs.
- Optical (Mouse) Encoders An optical encoder can connect devices such as trackballs, spinners, or rotary optical joysticks. The computer will interpret the connected controls as if it were a mouse.
- PRO + A trackball can act as a mouse.
Note that some vendors combine keyboard and optical encoders in one circuit board.
Choosing the right encoder depends on the types of software you plan to use. If, for example, you plan to play games that only support gamepads, it is wise to choose an encoder of the gamepad type. Identify the input capabilities of the software you plan to use and choose accordingly. Also certain types of controls (rotary joysticks, trackballs and spinners) require a specific encoder to be able to connect to the computer.
For some input types a software conversion is possible - for example the program "joy2key" is able to convert gamepad controls into keyboard strokes.
How many encoder inputs do I need for my control panel?
The encoder(s) you choose must be able to support all the controls you plan to use. Check the vendor-supplied information to determine the quantity and type of inputs each encoder can handle.
Digital inputs (IPac, KADE, KeyWiz, Mini-Pac, UHID, etc.)
- 4-way or 8-way joystick - 4 inputs
- Pushbutton - 1 input
- Coin-slot microswitch - 1 input
- Pedal (microswitch) - 1 input
Optical inputs - each axis uses 5v, ground, and two data lines (Mini-Pac, OptiWiz, UHID, etc.)
- Trackball - 2 axes (NOTE: Some come with a USB or PS/2 adapter)
- Spinner/360 degree wheel - 1 axis
Analog inputs - each axis uses 5v, ground and one wiper (A-Pac, KADESTICK, UHID, etc.)
- Analog joystick - 2 axes
- Paddle/270 degree wheel - 1 axis
- Pedal (potentiometer) - 1 axis
KADE extended mode (20 inputs ==> 26 functions + 20 shifted functions) or shifted functions can increase the number of controls connected to your encoder. Pros and cons to shifted functions are mentioned in the Number of admin buttons section.
Basic wiring
See also: Wiring Push Buttons and Conventional Digital Joysticks.
Quick disconnect sizes
For easy connection/disconnection, many joysticks and switches use standard sized tabs. Compatible connectors are named "quick disconnect terminals". (QDs)
Most microswitches use 0.187" (4.8 mm) QDs and some use 0.250" (6 mm) QDs. Most two tab buttons (Sanwa, Seimitsu, Goldleaf, etc.) and leaf switches use 0.110" QDs. (2.8 mm). Check the product description or measure the tabs to ensure you get the the correct size.
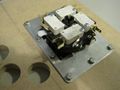
Female quick disconnect terminals
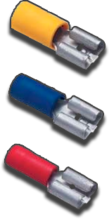
Male quick disconnect terminals


The color-coded plastic insulation sleeve indicates the size wire(s) that the terminal is designed for. Red is used for 18-22 AWG wire, blue is used for 14-16 AWG, and yellow is used for 10-12 AWG.
Soldering
Soldering is another option for connecting wires to components. Soldering electronics is a specialist skill which requires practise.
Soldering is the process of joining two metal components by melting a filler (the solder) between them. Often the joining process is accelerated by the use of a flux liquid to clean/prepare the surfaces. A soldered joint is semi permanent - the joint can be broken by melting the solder again.
A good solder connection will have both good mechanical connection (physically strong) and good electrical connection. (low resistance)
After soldering, always clean the joint and surrounding area with a cotton swab dipped in isopropyl alcohol to remove any residual flux and solder.
See also: Soldering tutorial
Commonly used wire sizes
Most control panels use between 20AWG and 30AWG wire to connect controls. AWG stands for American Wire Gauge. 22AWG stranded wire is a popular choice -- small enough to work with fairly easily, big enough for solid crimp connections and carrying current for many LED setups.
See Wikipedia for other wire gauges British Standard Wire Gauge, IEC 60228 and Gauge comparison chart.
How do I wire microswitches to an encoder?
The illustration demonstrates a common way of connecting the microswitches. Please read the topic Working with Microswitches for a detailed description of the microswitch connectors.

Wires 1 and 2 go to the Encoder input for the function you want the push button to activate. For example if the left button is the "Player 1 Start" button, the red wire labelled "1" goes to the corresponding input on the encoder. Note how the black wire labelled "3" is connected to the COM tab of both microswitches. The black daisy-chain ground wire goes to the ground connecter of the encoder.

The first schematic shows the same switches and wires connected to encoder (gray) input 1, input 2, and ground.
With no buttons pressed, the encoder inputs and wires have 5v connected to them, but like a light switch that is off, there is no path for current flow through the inputs.
The other schematics show the encoder registering a button press when ground is connected to the input which allows current to flow through that part of the circuit like flipping a light switch to turn on a light.
Power wiring
| ---DISCLAIMER--- |
| This Wikipage explains how to modify or connect electric equipment. Build Your Own Arcade Controls Wiki recommends reading the manuals of the tools and equipment you are using.
|

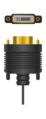
One popular choice for neatly bringing power into a cab is a power inlet with an IEC320 C14 socket.
Some of them have built-in switches and/or fuse holders.
A number of vendors carry similar products with several different types of switches.
See IEC Fused Power Inlet with a Lighted Switch for details.
Illuminating your cabinet
Main article Lighting.
See also: Finishing.
LED Lighting
Most arcade LEDs are designed to run on either 5v or 12v circuits.
You can use 12v LEDs powered by 5v for extremely-low power consumption -- commonly used for standalone USB control panels to avoid the use of a second cable for LED power.
Single color buttons
These are lit by a single-color LED.
RGB buttons
Can be hard-wired to operate like single color buttons, but the most common way to use these LEDs is with a controller.
These LEDs have 4 wires: Operating voltage (yellow or black wire), red ground, green ground, and blue ground.
This forum topic has a comparison of various RGB lighting modules and push buttons.
LED controllers
An LED controller allows the computer to switch LEDs on and off, change the brightness and (in the case of RGB LEDs) change the color. This allows you to illuminate buttons based on what game is being played or create animated light displays.
Several vendors sell LED controller boards for this purpose. Commonly used controllers are LED-Wiz, Pac-LED64, Pac-Drive, and U-HID.
The software LEDBlinky can be used to drive the controllers. The LEDBlinky software is compatible with various Front end software.
Displays
Main article Video.
Displays come in two basic types: CRT and Flatscreen. Both have advantages and disadvantages. CRT stands for Cathode Ray Tube and works by sending beams of electrons to a fluorescent screen. CRT displays in the consumer markets are becomming less and less common in favor of flatscreen displays. Flatscreen displays are available in LCD, LED, OLED, and plasma variants -- each with their own strengths and weaknesses but are generally categorised by availability and pricepoint. A small number of arcade cabinets used speciality displays such as backscreen projection.
See also the Monitor FAQ topic on the forums.
Differences: pros/cons
Arcade CRT monitor The arcade monitor offers the best arcade experience as these are the monitors used in the original cabinets. These monitors are hard to find. These monitors usually support low resolutions (which may or may not be a con, depending on the types of games you plan to play). See also: Arcade Monitors.
- PRO + Offer a real arcade experience.
- CON - Hard to find.
- CON - Requires a special videocard to use with a PC.
CRT television The CRT television can be used as a display. See also: Televisions.
- PRO + Close to an arcade monitor.
- PRO + Cheap and easy to find 2nd hand market.
- PRO + Common in the 4:3 aspect ratio (most common ratio for arcade games).
- PRO + Europe only: Most European TVs have the SCART connector for easier RGB connection. This makes the TV work exactly like an arcade monitor. See also this forum topic.
- CON - Generally very heavy (especially those larger than 19 inches).
CRT monitor The CRT monitor is a regular CRT PC monitor. Some types of CRT monitors (MultiSync Monitors) can display arcade hardware natively. See also: PC Monitors.
- PRO + Close to an arcade monitor (but not as close as a CRT television).
- PRO + Cheap and easy to find for sizes up to and including 19 inch on 2nd hand market.
- PRO + Common in the 4:3 aspect ratio (most common ratio for arcade games).
- CON - Harder to find in sizes of 21 inch and above (even in the 2nd hand market).
- CON - Generally very heavy (especially ones larger than 19 inches).
LCD Flatpanel The flatpanel computer monitors are the most common computer displays at the moment.
- PRO + Lightweight.
- PRO + Easy to mount inside a cabinet (due to the VESA mounting standard).
- PRO + Cheap and commonly available.
- CON - Sizes above 19" are usually in the 16:9 (widescreen) aspect ratio (4:3 is more common in arcade games).
- CON - Lack the authentic look ("too clean"). Some emulators provide graphic filters to simulate the look of a CRT monitor.
- CON - The viewing angle might be a problem (depends on the model and make- but it is something to keep in mind).
- PRO/CON Has a "native" resolution, which means it will look the best in a specific setting. Most emulators and software can be set to use this resolution.
LED Flatpanel LED display technology is an improvement over LCD technology and is currently common used in flatpanel televisions. If you plan to use a television model for your arcade, it is advised to verify if the connection options for the display are compatible to the computer you plan to use.
- PRO + Lightweight.
- PRO + Easy to mount inside a cabinet (due to the VESA mounting standard).
- PRO + Available in large sizes.
- PRO + Wide viewing angle compared to LCD.
- CON - Generally more expensive than LCD monitors.
- CON - Nearly all LED displays are in the 16:9 (widescreen) aspect ratio (4:3 is more common in arcade games).
- CON - Lack the authentic look ("too clean"). Some emulators provide graphic filters to simulate the look of a CRT monitor.
- PRO/CON Has a "native" resolution, which means it will look the best in a specific setting. Most emulators and software can be set to use this resolution.
Types of video connections
The type of connection depends on the display and the computer (or arcade hardware) used.
This is a list with common connection types and how to recognize them. Some connectors can be converted to another connector type by using a conversion cable; usually conversion is only backwards compatible (ie. Component can be converted to Composite, but not the other way around).
- Composite The composite connector is commonly indicated by a single yellow RCA connector. The signal (usually referred to as CVBS signal) is an analogue signal. This type of connector is often found on older TV sets.
- S-Video The S-Video connection (sometimes referred to as Y/C) is a (small) round with four pins. The quality is better than composite but the available color depth is not as good as component. The S-Video is connection available on some PC video cards (as secondary connector) due to it's small connector size. A S-Video signal can be converted to composite using a conversion cable.
- Component The component video (sometimes referred to as YCbCr or YPbPr) connection is indicated by three RCA connectors color coded red, green and blue. The video signal is an analogue signal. It is often incorrect assumed that this is an RGB signal (the confusion often stems from the color code of the cables). This is the best available analogue signal, it is commonly found on large television sets. A native YCbCr can be converted to composite or S-video using a conversion cable.
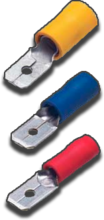
- SCART The SCART connector is common in Europe- almost all TVs sold are equipped with the connector (another name for SCART is EuroAV). The SCART connector can carry a mix of signals including analogue and digital RGB. The SCART connector can be identified as a two row 21 pin connector. Standard arcade monitors use the 'RGB with sync' signal which is also available in SCART. Note that SCART is a connector standard- it does not automatically mean that a device with a SCART connector is capable displaying all modes the SCART connector can offer. In addition to video, the SCART connector can also carry stereo audio. There is no "native SCART" signal, but there are conversion cables available to connect Composite, S-Video and VGA signals to SCART.
- VGA connector The VGA connector (The connector itself is called a DE-15 connector) is a connector recognisable as a three row 15 pin connector- usually color coded blue. It is one of the most common video connectors found on computers (even though it is superceded by DVI and HDMI connectors). The signal it carries is analogue RGB and produces a sharp image. A VGA signal can be converted to the DVI, SCART-RGB, Component, S-Video and Composite with a conversion cable. Keep in mind that for some conversions the host must be able to output a specified
- DVI The DVI connector is a rectangular (usually white) connector with a three row 24 pin and a two row 4 pin configuration. The DVI connector is a common connector on computers. The DVI standard can carry both analogue and digital video signals. A native DVI signal can be converted to VGA or HDMI with a conversion cable. Note that it is possible to convert VGA to DVI, it is however not possible to convert a native VGA signal via DVI to HDMI.
- HDMI The HDMI connector is a flat connector with a two row 19 pin configuration (the pins are usually joined by a plastic center). The HDMI connector is the current industry standard for high definition video and audio signal connections. A native HDMI signal may be converted to DVI with a conversion cable.

Composite

S-Video

Component
SCART

VGA
DVI

HDMI


Response time and input lag
Response time is the time for a display to change a pixel from black to white and back to black. This should not be confused with input lag. Video response times are often listed in the specification sheet of LCD or LED monitors. CRT displays have very fast response time due the refresh rates of 50hz or 60hz.
Slow reponse times may result in blurred movement. See also the Wikipedia page for more information on response times.
Input lag is the time it takes between an user action and the result being processed and displayed on the display. Input lag can be a problem in games where timing is essential such as rythm-action or fighting games. Since the processing of user input is also emulated, this may cause timing issues.
Input lag can come from software (emulators), firmware (some cheap encoders) or hardware (video converters or TV circuitry). Modern TVs have additional features to enhance the picture quality, these features however may contribute to input lag- check if the TV you are using has a "game mode" setting which bypasses most of the features. Some emulators offer options to sacrifice parts of the emulation for the benefit of speed. Another solution may be a faster computer to speed up emulation. The final option is to switch from emulation to simulation (for example use Step Mania to play Dance Dance Revolution style of games).
See also Wikipedia for more information on input lag.
Software
Main article Software.
A variety of software, emulators, and simulators allow you to play a huge number of arcade, console, and PC games on a computer. The software used as a foundation of a home arcade machine generally consists of:
- Emulators to run specific game ROMs on a computer
- ROMs and related files such as MAME bios files (Marble Madness needs atarisy1.zip) and CHD files (Simpsons Bowling needs simpbowl.chd)
- A front-end menu system to easily select and launch games
What is an emulator? What is a simulator?
An emulator is a software program that duplicates the operation of the computer hardware, firmware/software, and gameplay of an older game system. As the name implies it 'emulates' the system. See also: Wikipedia article on Emulators.
Emulators are often confused with simulators. A simulator does not try to re-create the operation of the original computer hardware/software/firmware but re-create the game itself. Therefore, an emulator provides an accurate re-creation of a game and a simulator provides a near-accurate rendition.
A simulator is often used when part or all of the game does not use fimware/software. Example: In Visual Pinball, the pinball playfield, lights, flippers and ball of Baby Pac-Man (the physical/mechanical parts) are simulated, while the videogame part is emulated using the original game ROMs.
What is a ROM?
Main article ROMs.
For the original games - Read Only Memory chips on the game board/cartridge that hold the program code for a game/game system. For emulators - .ZIP or .7z file(s) containing a copy ("dump") of the game/game system code.
Why do my ROMs not work?
It is not always guaranteed that a particular game ROM will work with a given emulator. The original memory chips may use encryption that is not yet decoded or a game may use a specific function that the chosen emulator does not currently support. Some games also require additional data such as a CD-Rom image or harddisk data - usually supplied as CHD (Compressed Hunks of Data) files. Also, the data extraction method/format may not be compatible with the emulator (or emulator version) of choice.
When using MAME, one can use clrmamepro [1] or your emulator's "Audit" function (if available) to check the version and filenames of ROMs compared to your MAME emulator program version. See also the rom manager section for other tools.
Commonly used emulators
See also: Arcade Emulators. See also: MAME Variants.
The most common used emulator for arcade machines is MAME, short for Multiple Arcade Machine Emulator. MAME can emulate a wide range of arcade hardware and thus can run many different games. However for some types of arcade hardware, very specific emulators are created which may perform better. For example Supermodel is a SEGA Model 3 emulator.
MAME is a major emulator in the arcade community, there are many different variants or "flavors" of MAME. These modified MAME variants often maintain the version numbering of the official (commonly referred to as "vanilla") MAME version to be clear what the base features and compatible ROM sets are. See MAME Variants. The most common variants are:
| MAME | The "official" command line program that the other variants are based on. | [2] |
| NoNag patched | Suppresses error messages that are useful when troubleshooting. | [3] |
| MAMEUI | Built in frontend. | [4] |
| MAMEUIFX | Built in frontend. | [5] |
| MAME Hub | Added network play. | [6] |
| HB MAME | Dedicated "homebrew" hacks. | [7] |
| Groovy MAME | Mainly aimed at CRT monitors and alleviating some annoyances associated with emulation on LCD displays. | [8] |
Should I upgrade my emulators to the latest version?
The answer is almost always NO. This is often a case of, "if it ain't broke, don't fix it."
Only upgrade your emulators if you benefit from the upgrade -- for example the new version now supports a game you want to play. Keep in mind that upgrading your emulators probably means that your ROMs need updating as well. If the new release fixes something that makes it worth the time and effort to update your ROMs and will still run well on your system, consider the update.
What is a Front end?
Main article Front-Ends.
A front end is software used to launch games. With some emulators it can be quite a hassle to switch between games, as each game may require different settings. A front end can provide the end user with a seamless experience from selecting to playing games. There are many front ends available, each with their own strengths and weaknesses. Please check the table on the Front-Ends wiki page for features of various front ends.
Other useful software
Main article Utilities.
The community has produced many small tools and utilities to enhance the home arcade experience. Some utilities are used to overcome a shortcoming of an emulator or the operating system, others are created to support a specific piece of hardware. Utilities may include input mapping software to redirect keystrokes to joystick buttons (or vice versa), tools to manipulate the video display - for example switch between horizontal and vertical orientation of the display.
Forum tips for asking questions that get good/faster answers:
- Search first, somebody else has probably encountered this problem before -- don't ask people to retype the same old answers to the same old questions.
- Take your time editing the post so it is specific, clear, and easy to read.
- Whenever possible, include decent pics/screencaps/diagrams/part numbers/links.
- Include software/OS versions if applicable.
- Include your location when asking about parts/vendors or electrical wiring. (different countries use different wire colors and/or voltages)
DISCLAIMER: The authors of the document linked below ask that we remind you that they are not a help desk for your project.
More useful tips on asking smart questions here.
Help make this wiki even better
You are welcome to contribute to this wiki. Take a look at the Community Portal for more information on how to help out. To contribute as an author or editor, you first need to create an account on the BYOAC forum and then post in this thread of the forum. One of the wiki moderators (Saint, Felsir, or PL1) will help you get started.
Resources and acknowledgments
The inspiration for this FAQ is the MAME FAQ written in 2003 by CitznFish. It is available via the Internet Wayback Machine.
The collective experience found on the Build Your Own Arcade Controls Forum.
Images used in the types of cabs section are based on the Sketchup models made by Gozer.