Difference between revisions of "Mala Tree"
(→What is MaLa Tree?) |
m (12 revisions) |
||
| (6 intermediate revisions by 3 users not shown) | |||
| Line 1: | Line 1: | ||
== Introduction == | == Introduction == | ||
| − | The Mala Tree is a menu structure you can use to visually organize your emulators and gamelists. | + | |
| + | The Mala Tree is a menu structure you can use to visually organize your emulators and gamelists. It uses a tree structure, meaning that the elements are organized in levels or "branches". | ||
| + | |||
[[Image:Mala_Tree1.JPG|240px|left]] | [[Image:Mala_Tree1.JPG|240px|left]] | ||
| Line 25: | Line 27: | ||
It allows for you to set different MaLa layouts for every menu or gamelist, giving you the freedom to create a very robust and varied experience for different gamelists if desired. It also allows you to set a different "snapshot" image for every menu or gamelist you configure, which can be used very creatively for an attractive and professional looking interface. | It allows for you to set different MaLa layouts for every menu or gamelist, giving you the freedom to create a very robust and varied experience for different gamelists if desired. It also allows you to set a different "snapshot" image for every menu or gamelist you configure, which can be used very creatively for an attractive and professional looking interface. | ||
| − | + | ||
| + | ==== Typical Mala Tree ==== | ||
Top Menu | Top Menu | ||
|_Emulator1 | |_Emulator1 | ||
| Line 38: | Line 41: | ||
Using your set controls, players can browse your tree with all movement commands except "Prev list, Next list, Prev emulator, and Next emulator". The configured "Menu Select" button is used to navigate down the tree, and the "Exit" button is used to navigate back up. | Using your set controls, players can browse your tree with all movement commands except "Prev list, Next list, Prev emulator, and Next emulator". The configured "Menu Select" button is used to navigate down the tree, and the "Exit" button is used to navigate back up. | ||
| − | |||
== Creation == | == Creation == | ||
| Line 45: | Line 47: | ||
The Mala Tree Editor is the central tool that is used to create and manage your entire tree structure. The buttons on the lower left of the window can be used to create a very simple menu, or an elaborate structure. | The Mala Tree Editor is the central tool that is used to create and manage your entire tree structure. The buttons on the lower left of the window can be used to create a very simple menu, or an elaborate structure. | ||
| + | |||
| + | "MAKE SURE YOU HAVE SET UP ALL YOUR EMULATORS AND LAYOUT FIRST BEFORE CREATING THE TREE" | ||
| + | ==== Creating an Example Tree ==== | ||
:'''1)''' To create an example Tree, press the "Add Menu" button. Notice that the tree structure at the left shows your changes in realtime, showing the :indicative "+" and "-" where you have branched the menu. | :'''1)''' To create an example Tree, press the "Add Menu" button. Notice that the tree structure at the left shows your changes in realtime, showing the :indicative "+" and "-" where you have branched the menu. | ||
: | : | ||
| Line 75: | Line 80: | ||
In windows, create a directory for your images and remember the location of it. You will be placing all of your tree's images in this location. | In windows, create a directory for your images and remember the location of it. You will be placing all of your tree's images in this location. | ||
| + | |||
| + | ==== Snapshot Filenames ==== | ||
The tree snaps file names have to reflect not just the name of your selections, but the name of the menu they fall under, as well. The format for them is "Menu name_selection name". | The tree snaps file names have to reflect not just the name of your selections, but the name of the menu they fall under, as well. The format for them is "Menu name_selection name". | ||
| Line 91: | Line 98: | ||
'''main menu_game boy.png''' | '''main menu_game boy.png''' | ||
| + | |||
| + | |||
| + | '''Note: the file names are case sensative. even tho Main Menu have CAP M's the file cant have them. thats all i did was make M's lower case and VOILA!!''' | ||
Latest revision as of 08:50, 5 December 2013
Contents
Introduction
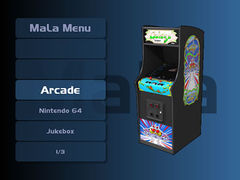
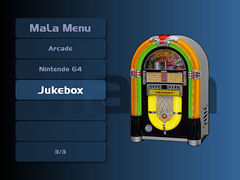
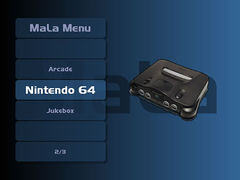
The Mala Tree is a menu structure you can use to visually organize your emulators and gamelists. It uses a tree structure, meaning that the elements are organized in levels or "branches".
It allows for you to set different MaLa layouts for every menu or gamelist, giving you the freedom to create a very robust and varied experience for different gamelists if desired. It also allows you to set a different "snapshot" image for every menu or gamelist you configure, which can be used very creatively for an attractive and professional looking interface.
Typical Mala Tree
Top Menu
 |_Emulator1
 |   |_Gamelist1
 |   |_Gamelist2
 |   |_Gamelist3
 |
 |_Emulator2
     |_Gamelist1
     |_Gamelist2
Using your set controls, players can browse your tree with all movement commands except "Prev list, Next list, Prev emulator, and Next emulator". The configured "Menu Select" button is used to navigate down the tree, and the "Exit" button is used to navigate back up.
Creation
Open the options menu (default: right-click anywhere in MaLa and select "Options"). Open the "GUI" tab, and select the "Use Tree" checkbox. This will activate the "Edit Tree" button, allowing you to Open the Mala Tree Editor. (Once the "Use Tree" box is checked, Mala will always look for your tree, and therefore will not display anything if you do not have one configured.)
The Mala Tree Editor is the central tool that is used to create and manage your entire tree structure. The buttons on the lower left of the window can be used to create a very simple menu, or an elaborate structure.
"MAKE SURE YOU HAVE SET UP ALL YOUR EMULATORS AND LAYOUT FIRST BEFORE CREATING THE TREE"
Creating an Example Tree
- 1) To create an example Tree, press the "Add Menu" button. Notice that the tree structure at the left shows your changes in realtime, showing the :indicative "+" and "-" where you have branched the menu.
- 2) Select the "new node" and rename it to something more fitting to reflect your desired menu structure. In this case, name it "MAME". You :will also have to select a layout for the the Branched menu itself (as you will for every menu or gamelist you configure).
- 3) While the "MAME" menu is selected in the tree, press the "Add Gamelist" button on the right. You will notice that a different icon is :created in the tree. When selected, this "new node" has some more options than the "Add Menu" option. The new "Emulator" and "Gamelist" drop :down menus allow you to configure the exact specifications of this new gamelist.
- 4) Name this gamelist node "All Games". To fit our name, choose the "Mame" emulator and "All Games" gamelist" from the corresponding drop down :menus.
At this point, you have created a very simple Tree structure that you can browse. Before you can view it in action, it must be saved. Select the "File" menu and choose the option "Save". Make sure that you save the tree with the filename "Mala", because that is the only tree that MaLa will check for when it runs.
You can proceed to exit the "MaLa Tree Editor" and the "Options" windows to test your new tree.
Other Options
In your example tree's creation, you may have noticed other options in the window. These are:
"Expand All": Expands the entire tree structure on the left of the window for your viewing.
"Check Tree": Checks through your entire tree's structure to make sure that all of your settings and configurations work properly.
"Move up" "Move down": These buttons allow you to organize the tree's menus and gamelists in any order you see fit by moving selections up or down in any list of items.
Snapshots
As stated, you can use a snapshot to represent any menu or gamelist that you have configured in the tree. The "Snapshot" area of any given layout is where the Tree's images will appear, so any image you create to represent your menus should take the size of this area into consideration.
In windows, create a directory for your images and remember the location of it. You will be placing all of your tree's images in this location.
Snapshot Filenames
The tree snaps file names have to reflect not just the name of your selections, but the name of the menu they fall under, as well. The format for them is "Menu name_selection name".
Therefore, for a setup such as :
Main Menu
  |_Nes
  |_Game Boy
The filenames for the snaps should be:
main menu_nes.png
main menu_game boy.png
Note: the file names are case sensative. even tho Main Menu have CAP M's the file cant have them. thats all i did was make M's lower case and VOILA!!
This also applies for submenus as well. You only need to type the name of the submenu itself, not the entire tree, in the filename. So for a setup such as:
Main Menu
  |_Nes
     |_Favorites
The snap for "Favorites" will just have to be named:
nes_favorites.png
In mala, open the "Options" window and navigate to the "GUI" tab. At the bottom of the window you will see a long box named: "Tree menu snaps". Click the browse button at the right of this box and navigate to your Tree images directory. Once you have set it, you can exit the Options window and see your images in action.
| Back to Mala Wiki - Mala Forum |


