Difference between revisions of "T-Molding"
(→Replacing old T-molding) |
|||
| (4 intermediate revisions by 3 users not shown) | |||
| Line 1: | Line 1: | ||
| − | + | [[Image:T-molding.png|thumb|200px|right|Illustration from McMaster.com]] | |
| − | |||
| − | [[Image:T-molding. | ||
Since the dawn of time, t-molding has been the edge trim of choice for arcade cabinets. It's low cost and ease of installation made it perfect for companies mass-producing cabinets that wanted a way of making the rough cabinet edges more attractive and resistant to wear and tear. | Since the dawn of time, t-molding has been the edge trim of choice for arcade cabinets. It's low cost and ease of installation made it perfect for companies mass-producing cabinets that wanted a way of making the rough cabinet edges more attractive and resistant to wear and tear. | ||
| Line 11: | Line 9: | ||
http://www.youtube.com/watch?v=hc2oWoxsrgE | http://www.youtube.com/watch?v=hc2oWoxsrgE | ||
| − | The t-moldings barbed rib anchors the trim in place and provides a very snug fit | + | The t-moldings barbed rib anchors the trim in place and provides a very snug fit. Because of this glue or fasteners are not usually necessary when applying the t-molding to a freshly cut slot. On a newly routed cabinet edge, t-molding can sometimes be difficult to press into the slot by hand- a rubber mallet can be very useful in this circumstance. |
| + | |||
| + | If you are bending it around a curve with a radius of 25mm (1") or less, it is recommended to notch (v cut) the barbs. For curves with a radius around 30-40mm (1.5"-2") I would just heat gun it carefully and knock it in while warm. Anything above that shuold go straight into the slot. | ||
| + | Another good tip is to leave your t-molding somewhere warm before using it. In the sun, on top of your hot water boiler overnight, in your bed with you (just tell your wife she wouldn't understand). The pro's have 'hot boxes' which they put the molding in and it comes out warm and flexible. | ||
| + | |||
| + | Once installed, the convex-shaped underside flattens against the surface, giving the molding a seamless look against the cabinet parts. | ||
| − | ==Replacing old T-molding on | + | ==Replacing old T-molding on Existing Cabs== |
''' | ''' | ||
| − | PLEASE NOTE: This instruction ONLY applies when REPLACING OLD T-MOLDING. There is NO need to use glue to install T-molding on a NEW panel/cabinet that has a freshly routed slot !!!''' | + | PLEASE NOTE: This instruction ONLY applies when ''REPLACING OLD T-MOLDING''. There is NO need to use glue to install T-molding on a NEW panel/cabinet that has a freshly routed slot !!!''' |
| − | |||
Sometimes you will need to replace old T-molding on an existing cab. Maybe you want to change color (of course NEVER change the original color on a original game cab !) or the old T-molding simply is dirty, damaged and old. | Sometimes you will need to replace old T-molding on an existing cab. Maybe you want to change color (of course NEVER change the original color on a original game cab !) or the old T-molding simply is dirty, damaged and old. | ||
| Line 25: | Line 27: | ||
Here is a step by step guide for replacing T-molding (depends on your cab of course !!!) | Here is a step by step guide for replacing T-molding (depends on your cab of course !!!) | ||
| − | + | '''Preparation:''' | |
| − | + | * Move your cab so that you can reach all parts that need T-molding easily. Remember that a lot of cabs also have T-molding running all the way on the backside ! | |
| − | |||
| − | |||
| − | |||
| − | |||
| − | |||
| − | |||
| − | |||
| − | |||
| − | |||
| − | |||
| − | |||
| − | |||
| − | |||
| − | |||
| − | |||
| − | + | * Make sure you have plenty of glue sticks, you will need lots ! Be sure you can easily reach them to "load your gun" since you will have very little time to "reload". | |
| + | '''Removal''' | ||
| + | # Remove old T-molding carefully by pulling | ||
| + | # Check the edge of the panel to be flat, check if there's any particles inside of the slot and remove them. It's a good idea to use a vacuum cleaner to be sure that most loose particals are removed. | ||
| + | '''Installation''' | ||
| + | # Put your new T-mold in the slot (DO NOT GLUE JUST YET !!!), following the corners. Be sure the mold is ALL the way in the slot (especialy at inner corners !) Then find out where your outer corners are and make the V shape cuts. I used a cutting pliers and tore the center stuff of the mold with another pliers. Be carefull it is very easy to go through the upper layer of the molding !! | ||
| + | # Cut the end of the T-molding | ||
| + | # Heat up your glue gun | ||
| + | # Remove the new T-molding from the slot | ||
| + | # Fill the slot with glue and right after that put in the T-mold, work in lenghts of something like 20 cm. It is VERY advisable to have someone there to help you. You go on with the glueing and putting in the T-mold, the other persons keeps pressing on the T-mold where you just went. This is especialy important in the inner corners ! VERY IMPORTANT: KEEP GOING ! Be ready to easily reach every part of the cab that needs T-mold. | ||
Luckely, glue-gun glue is quite forgiving, you can relatively easy remove it from flat surfaces, in half-warm and even cool state. | Luckely, glue-gun glue is quite forgiving, you can relatively easy remove it from flat surfaces, in half-warm and even cool state. | ||
Latest revision as of 23:16, 18 March 2014
Since the dawn of time, t-molding has been the edge trim of choice for arcade cabinets. It's low cost and ease of installation made it perfect for companies mass-producing cabinets that wanted a way of making the rough cabinet edges more attractive and resistant to wear and tear.
Installation
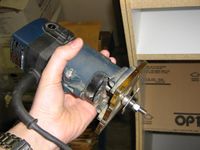
To install t-molding, you must route a 1/16" wide groove into the exposed edges of your cabinet; this is usually done with a router of some kind and a 1/16" slot-cutting bit. Some cabinet builders have mentioned that a Dremel tool can be used for this, though doing so is not recommended.
Here's a very useful video posted by Spacies showing how to go about slot-cutting for t-modling: http://www.youtube.com/watch?v=hc2oWoxsrgE
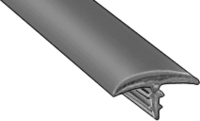
The t-moldings barbed rib anchors the trim in place and provides a very snug fit. Because of this glue or fasteners are not usually necessary when applying the t-molding to a freshly cut slot. On a newly routed cabinet edge, t-molding can sometimes be difficult to press into the slot by hand- a rubber mallet can be very useful in this circumstance.
If you are bending it around a curve with a radius of 25mm (1") or less, it is recommended to notch (v cut) the barbs. For curves with a radius around 30-40mm (1.5"-2") I would just heat gun it carefully and knock it in while warm. Anything above that shuold go straight into the slot. Another good tip is to leave your t-molding somewhere warm before using it. In the sun, on top of your hot water boiler overnight, in your bed with you (just tell your wife she wouldn't understand). The pro's have 'hot boxes' which they put the molding in and it comes out warm and flexible.
Once installed, the convex-shaped underside flattens against the surface, giving the molding a seamless look against the cabinet parts.
Replacing old T-molding on Existing Cabs
PLEASE NOTE: This instruction ONLY applies when REPLACING OLD T-MOLDING. There is NO need to use glue to install T-molding on a NEW panel/cabinet that has a freshly routed slot !!!
Sometimes you will need to replace old T-molding on an existing cab. Maybe you want to change color (of course NEVER change the original color on a original game cab !) or the old T-molding simply is dirty, damaged and old.
Most commercial built cabs are made of particle board. This is not as sturdy as materials like MDF. Following this, the slot made by the builders is sometimes not so tight and new T-molding doesn't stay in the slot without any help. It is relatively easy to fix the T-molding using a glue-gun.
Here is a step by step guide for replacing T-molding (depends on your cab of course !!!)
Preparation:
- Move your cab so that you can reach all parts that need T-molding easily. Remember that a lot of cabs also have T-molding running all the way on the backside !
- Make sure you have plenty of glue sticks, you will need lots ! Be sure you can easily reach them to "load your gun" since you will have very little time to "reload".
Removal
- Remove old T-molding carefully by pulling
- Check the edge of the panel to be flat, check if there's any particles inside of the slot and remove them. It's a good idea to use a vacuum cleaner to be sure that most loose particals are removed.
Installation
- Put your new T-mold in the slot (DO NOT GLUE JUST YET !!!), following the corners. Be sure the mold is ALL the way in the slot (especialy at inner corners !) Then find out where your outer corners are and make the V shape cuts. I used a cutting pliers and tore the center stuff of the mold with another pliers. Be carefull it is very easy to go through the upper layer of the molding !!
- Cut the end of the T-molding
- Heat up your glue gun
- Remove the new T-molding from the slot
- Fill the slot with glue and right after that put in the T-mold, work in lenghts of something like 20 cm. It is VERY advisable to have someone there to help you. You go on with the glueing and putting in the T-mold, the other persons keeps pressing on the T-mold where you just went. This is especialy important in the inner corners ! VERY IMPORTANT: KEEP GOING ! Be ready to easily reach every part of the cab that needs T-mold.
Luckely, glue-gun glue is quite forgiving, you can relatively easy remove it from flat surfaces, in half-warm and even cool state. You use quite a bit of glue in this way, since it will also fill the slot. Put a little bit of glue on the inner and outer corners on the side of the panel (above the slot). This will make sure you get perfect corners that stay on.

